|
|
|
Calibrating a Samsung HLP-5063W DLP
I've owned a Samsung HLP display for a couple years now and I've learned quite a bit about how it works and how to calibrate it. I thought I would share some notes on what I've learned. Though this exact model is not made any more, modern Samsung DLPs share a lot in common with this set and therefore most of these notes are still relevant.
Samsung DLPs have an extensive and complicated service menu. Most sets allow the tuning of grayscale, but Samsung takes these adjustments one step further with a colorimetry calibration engine that allows a full tuning of the set's color gamut. This allows these sets to be calibrated to match studio mastering monitors with astonishing precision.
Out of the box, however, these sets are far from perfect. The gamma curve is shallow and not smooth. Color temperature is way too high. The color gamut is out of whack. If these sort of issues are foreign to you, a good explanation of general image quality issues can be found here. Some of these issues can be corrected in the user menu with the use of a calibration DVD, but to really tune up these sets one needs to dive into the service menu with the proper tools. Because of the dynamically tunable primaries in this set one really needs to use a spectroradiometer for measurements. For these measurements I used a Gretag-Macbeth EyeOne Beamer with Datacolor ColorFacts Pro 6.0.
Since most people don't have access to this sort of equipment, I'm not going to go into too much technical detail on exactly how to perform each tuning, but I do want to give enough detail that one can get a sense of how these sets can be optimized by a professional calibrator.
I personally feel that all home theater grade displays should be professionally calibrated. No display is accurate out of the box and most are detuned to look cool in a showroom. Calibration should automatically be factored into the cost of the set as one does tax, stands, cables, or warranties. You wouldn't bring home a Bösendorfer and not call the piano tuner. A quality display should be no different.
Geometry
Horizontal and vertical positioning can be adjusted in the service menu with the V-Position and H-Position controls. Mine was not too far off, but it did need a little centering. Rotation and focus issues require a physical adjustment to the set through the access panels in the back. The adjustments are not too difficult, but they do require a second person or a mirror to view the image from the front. Luckily the rotation and focus were spot on for my set so no physical adjustment was necessary.
DNIe
DNIe is Samsung's image "enhancement" engine. A run down of what DNIe supposedly does for your image can be found here. On the surface these claims sound great, but on closer examination most of these features are either impossible (6 times density enhancer) or undesirable (dynamic contrast ratio). For every image DNIe makes better there are two images that it makes worse. There is no way these sets can hold a calibration with DNIe enabled. If accuracy is desired DNIe should be turned off and left off. On the HLP DNIe can be easily disabled in the user menu. It should be noted that there are a few models of Samsung DLPs (notably the HLR series) that have DNIe permanently enabled. Before purchasing a Samsung display I would make sure that DNIe can be toggled from the user menus.
Wobulation
Wobulation (aka. SmoothPicture) is a technique where the number of visible pixels on the screen is doubled from the number of physical mirrors in the imager. This is done by mathematically breaking an image into subframes, then displaying the two subframes in rapid succession, but offset horizontally and vertically by half a pixel. A overview of wobulation technology can be found here.
While wobulation may seem inferior to having a mirror per pixel, there seems to be few disadvantages to the technology. My HLP has been able to pass every native rate test pattern I have thrown at it. Besides reducing costs, it has one advantage in particular in that it creates an extremely high pixel fill ratio. This essentially eliminates the ability of a viewer to see the gaps between pixels, eliminating the visual artifact commonly known as "screen door effect" for its similarity to viewing the world through a screen door. Because of this extremely high fill ratio wobulation creates a video image with an astonishing similarity to projected film.
The degree to which the subframes are offset can be tuned visually in the service menu. When one changes the SP Actuator Gain a series of white and primary colored "plus signs" are displayed. As one changes the gain setting the edges of the pluses become jagged or smooth. The proper setting is half way between the low and high points at which the pluses become jagged. On my set the SP Actuator was correctly set and needed no adjustment.
1:1 Pixel Mapping
1:1 pixel mapping refers to the ability of 1 pixel in a native resolution source to illuminate 1 and only 1 pixel in the imager. On a 720p set like the HLP 1:1 pixel mapping means that a 720p source will be displayed with no scaling. This leads to a sharper image from native rate sources. Even though these sets are wobulated, 1:1 pixel mapping can still be achieved. It doesn't matter if the pixel is a "real" pixel backed by a single mirror or a "pseudo" pixel created by wobulation. In either case a native resolution source can be displayed without scaling.
Strangely Samsung likes to scale even native resolution sources so that less of the image is visible. On some Samsungs, like the HLR 1080p sets and the HLS-XX78 sets, this scaling can't be turned off (or at least it won't stay turned off). On other sets this extra scaling can be disabled in the service menu by toggling the OVERSCAN option to off. Luckily on the HLP 1:1 pixel mapping can be achieved in the user menu by setting the Picture Size to the bizarrely named Expand setting.
Before
The effects of this excess scaling can be seen if a 1 pixel black and white checkerboard is sent to the at 720p. Below is an image of a 720p 1x1 checkerboard when the HLP's Picture Size is set to Wide TV. This image should be perfectly smooth. Instead notice the large light squares and thick grid lines, these are scaling artifacts.
![]()
After
Pixel mapping is achieved by setting the HLP's Picture Size control to Expand. Notice how the same image is now smooth and continuous with no scaling artifacts.
![]()
Input Signal
From our pixel mapping discussion it should be clear that 720p is the ideal resolution to feed this set. There is however more to the input signal than resolution. DVD, HD receivers, set top boxes, and most other modern video sources are inherently digital. Since a DLP is also an inherently digital device it makes sense to connect your digital devices via a digital interconnect like HDMI or DVI. Connecting these devices via analog means that a digital program stream will be turned into an analog signal at the source, transmitted via analog, and then translated back to digital by the display. This leads to a loss of picture quality as these conversions between analog an digital are inherently imprecise. Analog only devices obviously need to be connected via analog.
When using an HDMI connection there are a few different formats that can be sent to the display. The most common are RGB (8-bit), YCbCr 4:2:2 (10-bit), YCbCr 4:4:4 (8-bit). The HLP will accept any of these formats, however they are all converted to RGB (8-bit) by the HDMI receiver chip. All data is passed through the set as RGB (8-bit), therefore there is no advantage from the set's perspective to receive any other format. One however may potentially choose another format if the source does a poor job with its RGB signal. In reality however it seems that devices get their YCbCr output wrong far more often than their RGB output. For instance many upconverting DVD players send an HD YCbCr signal using SD encodings resulting in a noticeable color shift on screen.
Gamma
There is a non-linear relationship between pixel value and the luminance of a display. This is done because the human eye has the opposite non-linear response to luminance. The standard gamma curve is the pixel value raised to the 2.5 power.
On the HLP a series of 16 gamma tables can be selected in the service menu. 8 of these tables are duplicates. Graphs of all the tables are available here.
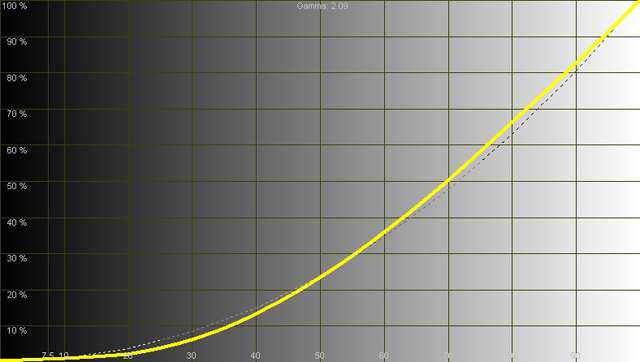
Before
The default gamma table on my set was table 4. This gamma curve is not only too high at 2.09 but not a smooth curve. It has a noticeable S shape. This means that whites will be pushed and blacks will be crushed.
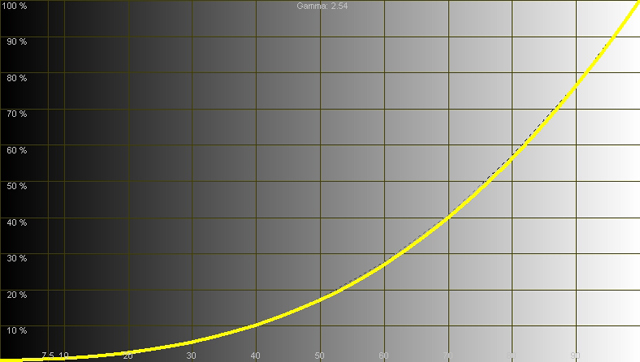
After
The proper gamma table for this set is table 0. It is the only gamma setting that is a smooth curve and it is spot on at 2.54.
Black Level
Out of the box my brightness was a bit low. Switching the gamma table made it even darker. Luckily brightness is easy to set without any instruments.
Since the mirrors in a DLP are either fully on or off, these sets use a technique called dithering to create a range of luminance. Dithering is most noticeable in the near dark shades and when you are very close to the set. Dithering should be invisible at a normal viewing distance. It will appear as busy, swimming pixels of similar shades even when the image is paused.
Dithering gives a way to set the level of black or brightness. Like most sets brightness on the HLP can be adjusted in the user menu. Viewing a pattern containing pure black you can increase brightness until you start to see dithering in the pure black, then decrease brightness until the very point at which the dithering has disappeared.
Note that there is a certain minimum black level that this set will not go below. The brightness control controls the dithering level, but does not actually adjust the brightness of the bulb. Later DLP displays have an adjustable iris which seems to me like a great way to lower brightness and contrast optically, but I have yet to play with one of these sets. Many consumers are accustomed to the inky black levels of plasma and CRT displays, and find the black levels of projection displays to not be dark enough. The black levels however are quite good and in line with the black levels of projected film. Check out the black levels of your local multiplex next time you're out at the movies, that's about the black level you can expect. I actually prefer this look to the inky black look. It feels much more like watching real celluloid to me.
White Level
By default these sets are insanely bright. A 100 IRE window measures about 260 cd/m2. In a dark room this is like staring at a spotlight. Contrast can be lowered easily in the user menu. The NTSC standard says that a 100 IRE window should be about 102 cd/m2. Commercial cinema standards are actually quite a bit lower at 40 cd/m2 in a dark cinema. Some front projector folks use this lower cinema value. I tuned my set to the 102 cd/m2 NTSC standard. This looks great in a dark room. In a bright room this may seem too dim.
Color Wheel
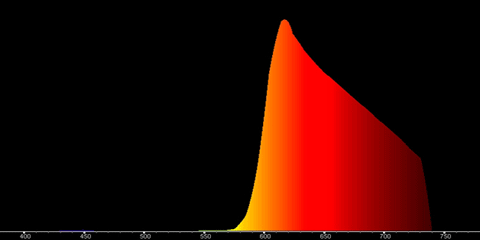
These sets use a multi-segment color wheel in front of a full spectrum light to rapidly cycle through a series of colors. The HLP line uses a 7 segment color wheel with two segments each of red, green, and blue, and one neutral density filter segment to enhance shadow detail. The timing of the color wheel needs to be set so that the correct segment and only that segment is in front of the light while the mirrors are in a particular positions. If this is off your primaries will bleed into each other and it will be impossible to get good color reproduction.
The color wheel timing can be set in the service menu. This is done by displaying a red field and looking for any blue or green in the pattern. This is difficult to do by eye, but with instruments we can see the full color spectrum and look for any of the other primaries bleeding in. The color wheel setting out of the box was actually quite good and need only slight adjustment.
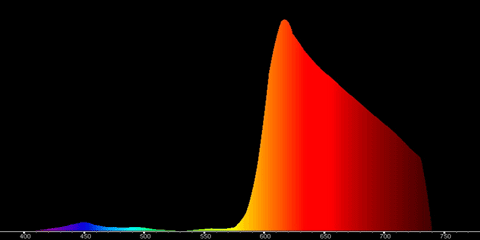
Too Low
Here the color wheel delay setting is too low. We can see some of the blue primary starting to bleed into the spectrum on the right.
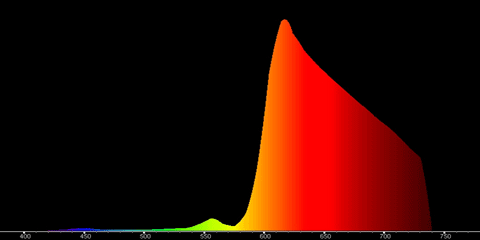
Too High
Here the color wheel delay setting is too high. We can see the green primary starting to bleed into the spectrum in the middle.
Correct
Here the color wheel delay is set properly. The blue and green primaries are not visible at all in the spectrum.
Grayscale
Grayscale tracking is the heart and soul of ISF style calibration. The goal is for the color of gray to track 6503K (D65) across the entire luminance scale. Like most sets the HLP allows adjustment of the grayscale at the low and high end of the scale. There are red, green, and blue controls for gains and cuts.
Before
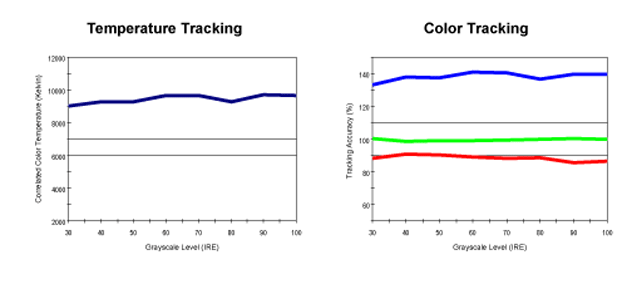
Out of the box the color temperature is way too high at about 9000K. It's relatively flat though it does rise a bit as the luminance rises.
After
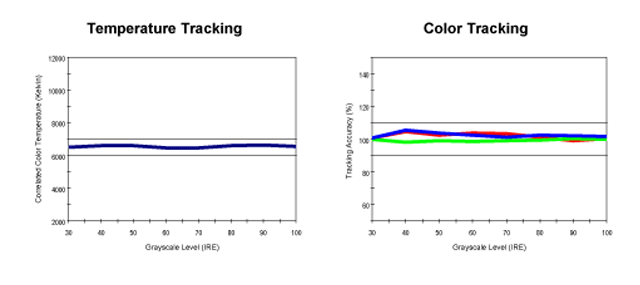
Once the gains and cuts are adjusted the color temperature is spot on at 6500K. The tracking is also much flatter than the out of box settings.
Colorimetry
The color gamuts of most consumer displays vary considerably from the standards. On most displays there is nothing you can do about this. Samsung DLPs starting with the HLP series contain a color gamut calibration engine called CCA. This allows a calibrator to precisely tune the xyY coordinates of the pseudo primaries and secondaries to any standard you like as long as it fits within the native color gamut of the set.
Pro grade mastering monitors adhere closely to the SMPTE 601 (SD) or 709 (HD) standards for color gamut. All SD programs, including DVDs are mastered on 601 gamut monitors. HD programming is mastered in the slightly larger 709 gamut. Newer Samsung displays (HLR and later) allow for two different color gamuts to be calibrated. Unfortunately, the HLP only allows a single color gamut to be calibrated. Since most of my critical viewing is still SD DVDs, I chose to calibrate my set to the 601 SD color gamut.
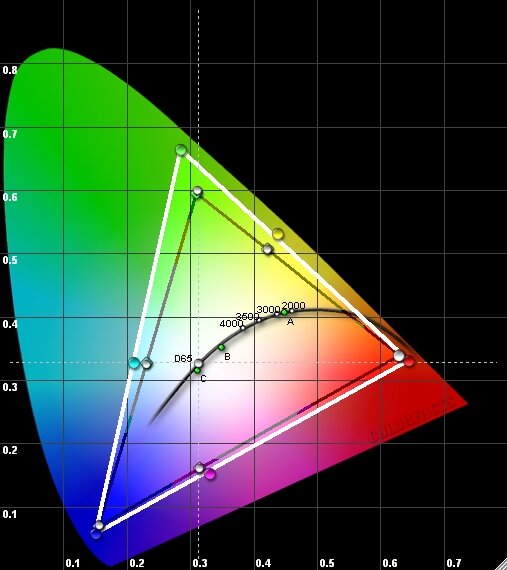
The diagram below shows several pieces of data on one CIE chart. The white triangle with the colored dots shows the native color gamut of the HLP. The black triangle with the almost completely obscured colored diamonds shows the 601 color gamut. The white dots obscuring the colored diamonds show the final calibration of the HLP using CCA. The color gamut is now spot on to the 601 standard.
Saturation
Oddly, on the HLP CCA moves the primaries and secondaries of your set around without lowering their saturation to compensate. This means that when we go back to the user menu after tuning up the set colors bars will be oversaturated. You can see this even with the naked eye and a blue filter. To compensate the Color control in the user menu needs to be lowered to about 50.
Banding
Out of the box there seemed to be some banding or false contouring problems with the set. On a gray ramp, which should be a smooth gradient from dark to light, distinct steps of gray could be seen, particularly in the dark areas. I had expected that the problem would be gone after calibration, but it was not. Through careful calibration of grayscale I was able to reduce the banding, but not eliminate it. I started experimenting with some of the more obscure settings in the service menu and found that lowering the Lamp Boost setting does essentially eliminate the false contouring artifacts.
I must confess that unlike essentially every other setting on this page, I have no idea what Lamp Boost is intended to adjust and it does sound like one of those settings that could alter the voltage your bulb and shorten your bulb or set's life span. The service manual is no help, as it simply defines Lamp Boost as "Adjusts Lamp Boost". Based on my experience I tend to think it does not actually alter the lamp in any way, but is some sort of scaling factor applied to some of the math the set is doing, but I really have no idea. It eliminates the banding issues on my set so well that I have left it lowered for at least a year and half with great picture quality and no ill effects. Your mileage, however, may vary.
Video Delay
There are several stages to the video pipeline on these sets, which can add up to a noticeable video delay. The delay is significantly worse when "Film Mode" deinterlacing is enabled. When audio is played through the HLP's built in speakers it is delayed to keep it in sync with the video. When audio is routed to an external receiver the video can lag behind the audio. This is a common issue in modern video processing displays and many receivers and preprocessors have an audio delay feature to compensate for this. There are also some 3rd party products that can delay audio if your receiver lacks such a feature.
At 720p the video appears to lag 39ms behind the audio from my receiver. Note that every receiver likely has a different audio latency, so this value may be different on different systems.
The video lag means that this is not a great display for fast paced gaming. This is probably my one disappointment with this set. Newer Samsung DLPs (HLS and later) feature a low latency game mode which reportedly works well, but the HLP lacks such a feature.
The Final Picture
So how does it look when it's all tuned up? Well, astonishing really. I am feeding the set some top notch sources and that helps, but the set itself is remarkable. It is a very film-like experience. Previously some shots would look amazing while others didn't look right. Now every shot looks good. Color saturation is under control. Grass doesn't look neon green. Flesh tones are not excessively red. Shadow detail is greatly improved. Detail in highly saturated areas is improved. The picture is smooth and free of contouring.
A calibrated set may take a little getting used to for someone who is accustomed to the punchiness of the out of box settings on these sets. The calibrated picture quality is more subtle with focus on balance, accuracy, and detail rather than the "wow" factor of super bright whites and highly saturated colors. Films on DVD will more closely resemble the films as you saw them in the theater. Sporting events and nature programs will be almost as if you're gazing through a window at the real world. All in all you'll be seeing the picture exactly as the professional doing the mastering did on his pro-grade display.
|
|
|
Copyright 2006 GADGETBENCH |